
The Parallax Effect!
- infamousproduction0
- Apr 27, 2021
- 4 min read
Another lesson from Jonny Lynn on week 11, when he initially showed his example of the characters from Warhammer I was extremely excited to start this as I had come off watching a video the night prior on The Animation of Guilty Gear Xrd & Dragon Ball FighterZ. So I already had a good idea on what to do. (If you are interested in animation at all, I recommended the video from New Frame Plus I linked above. It really is impressive and just how new this idea is).
I have never been one for drawing, I enjoy it at times but I don't normally have the patience or skill to create something as high quality as some of my favourite artists like Akira Toriyama or Toyotarou, however the Parallax effect allowed me to create potentially something similar to the Dokkan Battle series that uses a similar effect to what Jonny included in his video.
Getting Started.
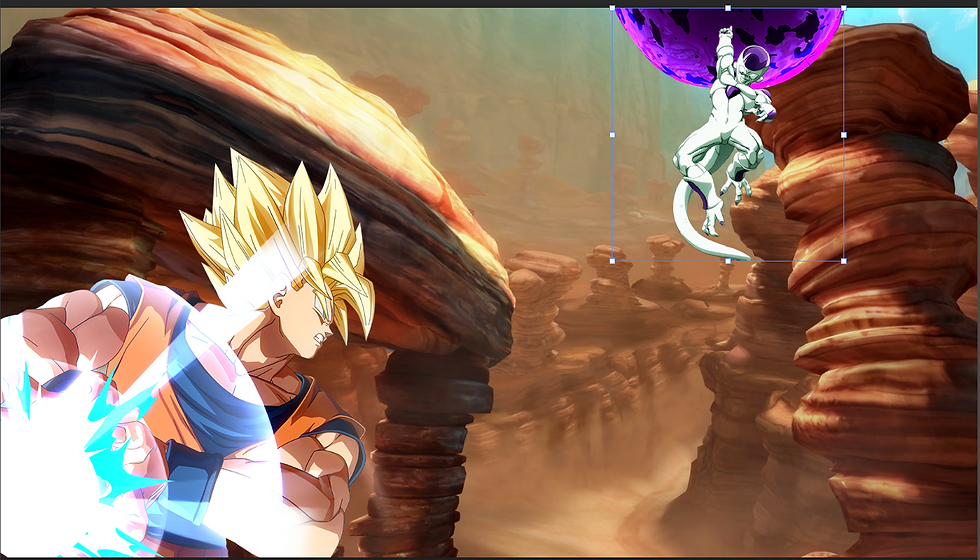
Jonny recommended going into photoshop first and cutting out what we wanted from the image, eventually to be manipulated within After Effects to help achieve the Parallax. The image I had chosen was from the Dragon Ball Fighterz launch screen. It looks something like this:

I have to admit, I have next to no experience on photoshop. I was a little nervous going into this but it was something I was playing more around with as the weeks went on during this course so I am glad I put in a little time of getting familiar with it. I used it to make two Arcade Stick designs for my Razer Pantera Evo and they turned out like this in the end:


If you hadn't already been able to tell I am a huge Dragon Ball fan. But thankfully these exercises I did in my own time served well for when I cut Goku and Frieza out of the image.
Getting started I used the pen tool to go around Goku and then worked my way up to Frieza:

After I had both of the cuts separated into their own independent layers, I decided to go with a different background entirely as I didn't really want the entire cast of characters that you see above. So I booted up my copy of the game on PC and was able to grab a screenshot of the Wasteland stage which would function as my background.
I played around with the positions a little before progressing in Jonny's video, which in the end was irrelevant as After Effects as Jonny had showcased allowed us to manipulate the images in a 3D space a lot like 3D Studio max we had used in lesson #5, something to remember for next time.
Importing the Photoshop file to After Effects.
After importing I watched on a bit in the video, Jonny explained that in order to grasp this concept was to think of it like a pop up book, this was extremely helpful in the long run as it gave me a better idea visually in my head of what way to do this.

He then explained about making a camera and setting it up, using the Unified Camera tool which was then updated to Orbit eventually He explained to use this for the custom view as it would allow us to see the ranges of the images more clearly from one another.

I spent a bit of time manipulating the positions of both Goku and Frieza as my idea for this Parallax effect was a clash between the two arch enemies. After I was happy I then began following the steps Jonny had given, using Keyframes to give the layers data to how they should move an position themselves as the timeline progressed.
Jonny was also nice enough to provide a really cool atmosphere effect that he ad used, however I also searched on YouTube (I will include the links to the videos I used below at the end), Green Screen effects such as the energy that comes out of the Orb that Freiza has above his head as well as an energy sphere that would grow in Goku's hands simulating the charge of his Kamehameha.
I added a venetian effect to Goku to simulate his instant transmission technique but made it short to make it look like he teleported in front of his nemesis, then lighting techniques were shown by Jonny allowed me to utilize the Ambient light, Point lights that were added to both of the energy attacks respectfully combined with the Wiggle menu to add more depth to the image.
Everything combined together looked like this:
Giving some sound effects on Premiere Pro.
I was really happy with the Parallax effect but wanted to add more depth, I went on YouTube and found some free sound effects from other creators such as a teleport noise and a beam charging to bring the image to life.
All of the elements from Photoshop, After Effects and Premiere Pro combined achieved the final product below. I really enjoyed this, as time consuming as it was time consuming, but because I love the franchise it was so rewarding to have something like this come to life. I will definitely be attempting more effects like these in the future as it was super fun and rewarding to work on.
Links from YouTube used.
The channels below have some really neat free resources that made this possible, please check them out!
The Beam Charge Sound Effect: https://www.youtube.com/watch?v=DKhYRsMTNx0&list=LL&index=6
The Beam Launch Sound Effect: https://www.youtube.com/watch?v=pwaCwBkUJBE
Green Screen, Plasma Energy From Frieza's attack: https://www.youtube.com/watch?v=hG7DTUauOM8&list=LL&index=10
Green Screen, Energy Ball for Goku's Kamehameha: https://www.youtube.com/watch?v=XqTa6oGM7ck&list=LL&index=6
Teleport Sound Effect: https://www.youtube.com/watch?v=s9su52qMWVU


Comments