
Green Screens Episode IV: A New Tool
- infamousproduction0
- Mar 25, 2021
- 7 min read
Quick Update
Normally it takes me a little bit longer to complete these lessons due to personal circumstances that have hindered me over the past year but as of this post, things are finally starting to get back to normal and I plan to be putting out these posts more frequently. Can I get a WOOOHOOO!?
Other quick news, I recently acquired a Nikon 3300 DSLR Camera and will be going to purchase a Sony HDR-CX625 Camcorder later in the week. Words cannot describe my excitement as I will finally have my own tools to start recording, experimenting with and creating content.
Lesson 4 Greenscreens and Rotoscoping, a new tool called Mocha and camera tracking!

Like all the lessons prior, Jonny provided the media and the content to learn this new tool, it contained an example that showcased his footage cycling through multiple different visuals he added to the background.
I personally really enjoyed last weeks lesson as it really opened my eyes and expanded what was possible using the software, but in this post I will be focusing on some new areas that Jonny had shown us during the lesson.
Camera Tracking
This was something we had done on a much more basic level, I found this one infinitely more fascinating as this method plots out several tiny points that we can use as an anchor point for a camera. The method to doing this was using the Track Camera, this analysed everything and then applied it as an effect to the layer in this case the video, so that way it was more accessible if we ever needed the data. Below you will see the three stages of the feature and the end result.


As you can see after going through the footage that we had shortened down to 2 and a half seconds, the reason for this I will explain later. But as for now you can see a bunch of little "X's" on the screenshot above, these are essentially all of the points that the software has mapped and we will use this for an anchor point for the camera.

Above you will see that the anchor points specifically allow us to draw around them, creating a red target marker in the centre to create a more accurate point for the camera tracking effect to work. This means when we add the mountain background footage it will make it more realistic with the camera movement when we create the new track layer by right clicking on the yellow circle markers.


After going through this process of Create Solid and Camera it gives us a pink square that I blew up in size to make it easier to see. Once this was in our list of layers, it was time to add the background video that we would be using in the example. There wasn't too much to talk about in the next part, however I did find Jonny's tip very interesting that the further the subject is away in this case the giant rockface that we would be using, give it a more realistic camera movement due to it being so far in the distance.
This would take a lot of dragging into the background using the Z axis, I ended up moving mine back to 100,000 which was an insane distance and I had a bit of concern how this would effect the final product but it actually, like Jonny said gave it a more believable static appearance. After this it was a lot of playing around with the scale of the image, which we were told to make 3D so it wouldn't effect the scale of the video. Through a lot of tweaking, here, there and everywhere the back drop looked really good, at least to me.
The Mocha Masquerade
Jonny explains that "Mocha" is a far more powerful way of masking and rotoscoping that is primarily used for more extreme cases of masking, but when it came to something as complex as we are about to undertake it just makes life a little but easier.
It is found in Effect > Borris FX Mocha > Mocha AE, after it will be added as an effect and then double clicking on the "Mocha" logo will open the programme in a new window.

As you can see it is really different from After Effects, everything seems a bit more minimal on the user interface but we only ended up using a hand full of the programmes features so I will be excited to play around with this software in the coming weeks.
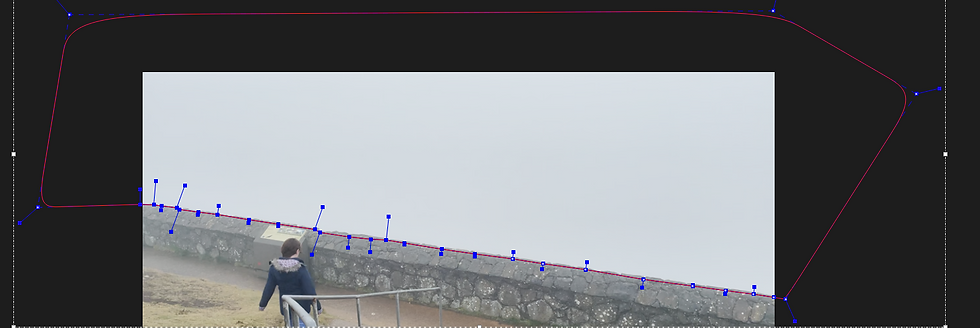
We would be using a tool called the "X Line Tool" which I will show below this paragraph, but essentially it is like the masking Pen you would see in After Effects this allowed us to draw around the subject area that I would mask off eventually.

I used this to draw along the wall from the very start of the footage, from corner to corner to give the foggy cloudy area as you have seen in the above screen shots and it ended up looking like this in the end.
After drawing this Jonny said to use the track feature which was similar to the track feature in AE, this would track frame by frame to see what the bets possible path of animation would be. It blows my mind how these programmes work, but like all technology there are times a human hand is needed to guide it.
I went through the entire clip dragging the wireframe as it fluctuated to make sure it wasn't overlapping in the area that I wanted to mask off, this in turn created several key frames that saved where the wireframe should be in a particular frame of the footage.
After this had all been done, as per Jonny's instructions I saved the mask, closed the programme and then back in After Effects I clicked on Create AE Masks which then added the data to the video layer making it look like this.

At this point, I am not going to lie I freaked out a little and though that I had done it wrong but thankfully Jonny explained after that the way to fix this was to click on the invert tick box and it flipped the mask area from the above screen shot to the one below.

As you can see the subject footage is back to where it should be, I also decided to include some of the timeline of the composition to show that all the data we had added in Mocha named "Layer 2" had been added and you can see the key frames running along the bottom of the above screenshot.
Now with the vantage point of the wall masked off, I had to now go back and do the same for the woman in the footage. Which just meant following the same process as above, drawing around the subject, then analysing backwards and forwards if needed to manipulate the wireframe to follow her movements until she leans over the wall.

After I had spent a bit of time getting this right I did the same as before, saving the data, returning to After Effects by closing the Mocha window and then creating the AE Masks.
When it loaded all of the data I needed the new window looked something like this.

With that out of the way it was time to blend everything together and continue on with the project. I have to admit however, I really enjoyed this section. I am the type of person that has OCD and I like taking time to make sure everything is perfect so I could see myself in the future having a lot of fun with this particular feature due to the nature of what it is capable of.
When I make some effects for my show reel, I will definitely be incorporating this into my show reel when I go to showcase some of the visual effects for some of my favourite fighters in a live action setting.
Blending Everything Together
I tweaked the background so many times I lost count, I wanted to make sure the mountain looked as real as possible as apposed to Jonny's fantasy approach he took in his show reel. I liked Jonny's ideas and I really think I will try to utilize similar styles going forward but I wanted to see if I could blend the composition to a realistic style.
I moved the Z axis a bunch, further and further backwards. After I was happy with the position and the movement of the camera I scaled the background footage up a bit more in order for it to fit the frame.

I ended up moving the position of the mountain footage on the Y axis up until I could see the clouds a bit more as you will see in later screen shots, this was something I constantly moved around as I blended the layers together.


I tweaked the contrast, shadows and whites in order to try and make the two pieces of footage a bit more similar as they differentiated in quality due to the fog. Once I got it to a place I was happy with I then added an adjustment layer to try and bring together the two pieces even further.

I added grain at .650 and then eventually dropped it to .450 and acheived a similar amount of grain that looked like the footage, at least I think it did and then played around on the adjustment later adding the CLEAN KODAK and tweaking a few more settings that you can see in the screenshot below.

With that my footage was finished and I exported the file.
And that's a Wrap!
I really enjoyed this weeks lesson, it kind of makes me wish we had gotten more of this at the start of the semesters as I can only imagine all of the tips and ticks Jonny could have shown us. However, I feel that this has been definitely a good way to learn the fundamentals and apply them in a lot of different ways going forward. So I will be very excited to use these techniques within After Effects and it's many plugs in's in my future attempts.
My finished product is below, thank you for reading!


Comments